keskiviikko 23. marraskuuta 2016

Bolt Action - Desert raiders

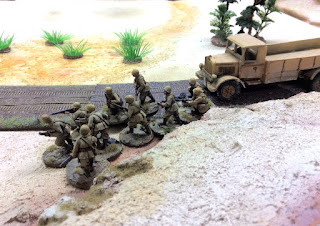
Back to desert with some heavily armed trucks! My club mate had some nice Italian trucks painted and asked me for a game of Bolt in the Desert. I naturally agreed since this was an opportunity for me to field LRDG team I haven't had chance to play yet. So we agreed a game and went back to Beda Fomm, since it is very mobile scenario and all Italian troops are in the trucks. So I gathered blocking force from my 8th army footsloggers and flanking force from LRDG veterans. Italians had four trucks full of infantry, a command team and a tank.

The fight started by Italians driving through the pass into he open where they were immediately fired by British blocking force behind the roadblock. First truck was set in flames and troops bailed out. More trucks speeded along the road and Italian traffic jam was gradually forming. This was the moment when LRDG flanking force hit and heavily armed jeeps and a Chevrolet truck knocked out another Italian truck. Just after that veteran infantry speeded in dismounted and eliminated Italian squads one by one by firing and in close combat. This was retaliated by Italian tank which rumbled in and gunned down helpless SAS troopers. One jeep with heavy machine gun was trying to pin the ending in flames itself. Fast strike and bold assault just in the middle of Italian convoy caused such confusion that rest of the fight was fought on the mouth of the pass. There British fire power was decisive and almost all Italian infantry lost. Only lonely tank was left but it withdraw or surrendered in the end.

The scene, empty desert road through the pass.
AT rifle waiting in ambush.
Desert rats arranging roadblock ambush. 
First Italian truck speed in.
The more followed by the officer.
After first truck got hit Italian troops dismount and prepare to fight.
On truck out and Italian HQ is checking the plans.
LRDG strikes - Tally Ho!
Veteran desert raiders join the fight with murderous effect.
Heavily armed jeeps flanking Italians. 
Italian troops pushing forward by the burning trucks.
More Desert Rats join the fight,
Remaining desert raiders push forward selling their lives dearly.
One jeep knocked out.
In the end only Italian tank was remaining on the road.
Strong British blocking force is holding it's ground.
The day went for the British. The heroes of the fight were SAS troops that took out two full infantry squads boldly attacking straight into the enemy. They were gunned down but they really swung the fight and stole initiative from the Italians. And off course those scary LRDG vehicles bristling with machine guns pouring insane amounts of fire. On Italian side the tank was the man of the match.

Nice game in good company, good stuff!

maanantai 7. marraskuuta 2016

Bolt Action - Across the River

Once again Bolt Action on the club, second game with new Ed.2 rules and this time I wasn't playing, but game mastering this one. Few friends asked if they could test new Ed.2 rules so I devised a game for them. Both players were familiar with BA game, so there was no need run basics  and we concentrated on new features of Ed.2.

This game was first run for our new river board we made for display purposes, when we were presenting our Club in an event near Helsinki. The board has river running through it, so it's more or less bit tricky board to play. But it's a beauty and we like to play narrative and thematic scenarios, not focusing on strict balance of the game. So. I based the game on "take the bridge" scenario, which I slightly modified. Now, instead of taking a just a bridge, the attacker had task to secure two river crossings, a bridge and a ford.

The fight was located somewhere in France in late summer -44 where US troops were doing strong push towards Paris. A battle group of Rangers and Paratroopers were tasked to take and secure two river crossings for the armored units. Germans were defending, but they were badly stretched and there wasn't strong troops to guard the riverbanks in all crossings. So the was only unit of infantry, MMG and PAK40 guarding two crossings.

At the start US elite troops made strong push towards both crossing at the same time. US troopers advanced swiftly to river and later they were backed by Sherman. Germans put up good fight but their fire wasn't enough to stop US veterans determined attack. Soon US troops started going across on two spots and after that they quickly eliminated German resistance. Not even the second wave of Germans wasn't able to change the push. So in the end US force took both crossing points and almost wiped Germans out totally.

The game went for US too easily, but as I said, the main focus of that scenario wasn't to find balance, but have thematic fight. But next time I'll give Germans armored support, a tank or SP sun and maybe some more infantry. Also the rules of wading in the river need some adjustments.

Here's some eye candy of our new table and the fight along the river.
One objective, a ford to be taken. 
Second objective was this nice bridge. 
Sherman rumbles in.
Rangers start advancing.
US airborne on left flank.
Rangers rush for the bridge.
Rangers advance cautiously to river.
Across the river, troops! 
This ruin was fire base for MG42, paratroopers took it.
Rangers doing risky business attacking another ruin full of Germans.
Last fire fight, after this Germans withdrew.
Quite nice game, bit unbalanced and next time we do this I'll do some alterations for the scenario. When wading, troops get only +1 cover and they can't use their weapons at all. Would like to test this again....


keskiviikko 5. lokakuuta 2016

Bolt Action - Demolition

First game of Bolt Action with new V2 rules. And Bolt Action game after some time. And it was like coming home. New rules are very much the same old BA, but with some nice additions which make the game even more fun.

The actual game was a scenario Demolition from the new rulebook. In which both sides have the same mission to destroy enemy depot or something. Not very interesting, but worked well as a test bench for new ruleset. In the future I'd prefer attacker - defender scenarios with good background story.

The actual fight started with British commandos forming up to make two pronged attack on German ammo dump. Germans formed up on their left a flank to advance to Allied fuel supply dump through bombed out village ruins. Both supply spots were left quite lightly guarded, British opened the fight by Arty FO calling in fire mission. On the opposite side German lieutenant ordered two infantry squads to move forward and then followed them.  Then artillery struck but missed the mark and shells dropped quite near commando unit and they got well pinned. Germans on the left flank moved forward but came under fire from British machine guns and mortars. Intense fire fight erupted around the village ruins, but casualties were still low. Then Cromwell tank rolled in and gunned down some more Fallshirmjägers. And then to finnish the job, German squad on far left was assaulted by tough commandos and got killed outright. Germans brought in their reserves and fortified their supply depot by infantry squad which made fire base behind cemetery walls. They were supported by Stug 42, so there was no way that Commandos were ever able to destroy depot. When German advance stalled on left flank and situation turned in senseless fire fight, which only caused casualties without results, bith officers ordered withdrawal and fight ended up a draw.

And then the main thing, nice pictures from the fight.
Bombed out village on Belgian border.
Commandos start advancing across the field.
Fallschimrjägers advance through the forest.
Cromwell rumbles in.
Commandos regrouping after successful close quarters.
Commando officer changing tactics in the cover of ruined house.
Fallschirmjägers advance through the cemetery.
Fearsome MG42 in ambush position.
Germans on left flank just before they decided to start withdrawing.
Commandos behind the ruined walls quite hesitant. 
Officer ordering covering fire.
Cromwell moving in to challenge Stug.
Germans in good position.
"Let's go boys. to fight another day"
German sniper observing the situation to unravel.
As I mentioned before, good old Bolt with new spices, which make it even tastier. Nothing is missing but many new features have been brought in. Good upgrade! And off course nice game if not the best scenario.


keskiviikko 7. syyskuuta 2016

Black Powder - Hubbardton 1777

Our slow paced AWI campaign continued once again. This time the fight was small advance guard confrontation up in Vermont. Advance guard of Continentals was sent forward to gather stragglers and protect their retreat from British hands. The engagement was fought by the river. Rebel force was facing truly superior British infantry, light infantry and grenadiers, elite in many ways.

The battlefield was dense forest and only the Monument Hill was barren. Forest gave proper cover but was hindering the movement throughout the fight. Not at all typical Black Powder fight but quite typical during AWI.

Continental troops were deployed mostly on top of the Monument hill and few companies from various regiments were sent to watch over the river and check the crossing of British. British troops marched in led by light infantry. Later they were followed by stout grenadiers. British light infantry advanced quickly by the river  and opened fire on Continental companied from other side of the river. Continentals returned fire and fire fight lasted for a while. More British troops came in the forest by the river. At the same time Continental infantry closed by to fire on British troops preparing to assault across the river.

The fight stalled for some time and troops from both sides of the river concentrated on intensive shootout. The the British general decided to attack. Left flank of British troops assaulted across but strong right wing didn't got commands clear and stayed put. British left flank started close fighting with Continental regiments but wasn't able to mount strong assaults. So brave Continentals repelled many assaults of British grenadiers. At the same time one Continental general was frantically gathering stragglers and ushered them away back to their regiments.

The last phase on the fight was when finally British right wing managed to cross the river. At the same time the Continental general somehow got distracted from the objectives, which was to bring his men safe and kept on futile fight against  overwhelming British troops. The poor stragglers were saved, but the Continental advance force was lost in result. Yes, Crown troops won.
British advance guard march to river.
Strong red line prepares.
Continentals start fire fight which was to last for some time.
More British flags can be seen by the worried Continentals.
Prepare for the assault boys!
British launch the assault but right wing misses the command and stays back.
British grenadiers assault.
Continentals defend the hill quite successfully.
Until they break.
The fight is over and remnants of Continental troops retreat.
Really interesting scenario and good hard fight. British were absolutely elite all the way. But Continentals took advantage from the terrain and were able top put up solid fight. Fun game, truly.